-
HackOTG (v1.2): Basic connectivity to the internet
This article is part of a series: you can find the first article here. If you missed the previous one, it is here.
After the previous article, we can plug-in our HackOTG and log in with SSH over the emulated Ethernet-adapter. Now, we don’t have internet-connectivity yet… Sometimes we will want to have an internet-connection to install new packages, backup our device or have a new way to connect to our device. In this article we will go through the basics of networking on your HackOTG.
Setting up the interface and scan
Log in to your HackOTG over the emulated Ethernet device:
ifconfig usb0 192.168.7.3
ssh [email protected] #password is "raspberry"
Activate your Wifi-interface:
sudo ifconfig wlan0 up
Scan for available Wifi-Hotspots:
sudo iwlist wlan0 scan | less
Associate with the access point
There are a couple different security mechanisms, in the previous performed scan you’ll find which one your chosen hotspot uses.
WEP
This is one of the oldest security mechanisms, which has many flaws but this is how you connect: (replace “testessid” and “safestpasswordever”)
sudo iwconfig wlan0 essid testessid key s:safestpasswordever
WPA
A common security mechanism is WPA. WPA has many flavours but most of them will be accesible with the following steps.
Create a config-file: (replace “MYSSID” and “passphrase”)
wpa_passphrase MYSSID passphrase > MYSSID.conf
This will create a config-file with a hashed passphrase (for security reasons). If it is a public (unsecured) WiFi, you can create the same file with these contents.
network={
 ssid="MYSSID"
 key_mgmt=NONE
 }
To connect: (replace “interface” and “MYSSID”)
sudo wpa_supplicant -B -i interface -D wext -c MYSSID.conf
The driver “wext” can be changed out for other drivers found in the “wpa_supplicant -h” command. With the built-in wifi on the Pi zero, you can use “wext”. The “&” at the end of the command will run it in the background.
Requesting an IP
Now that we are assosiated and authenticated, we need an IP, We can get it from the DHCP server running on the router with this command:
sudo dhcpcd --nohook wpa_supplicant wlan0
Automate the process
You can write a bash script, so you can connect to a wifi-hotspot with one command. You can make multiple scripts and config-files to connect to different hotspots.
sh connect_wifi_ssid.sh
connect_wifi_ssid.sh:
sudo wpa_supplicant -B -i wlan0 -D wext -c ssid.conf
sudo dhcpcd --nohook wpa_supplicant wlan0
It is a good idea to make a connect_wifi_HELP.txt, that contains the wep and wpa_passphrase command and some guidelines to connect to WEP and WAP (so you don’t need this article).
connect_wifi_HELP.sh:
##SCANNING
sudo iwlist wlan0 scan
##WEP
sudo iwconfig wlan0 essid testessid key s:safestpasswordever
##WPA
wpa_passphrase MYSSID passphrase > MYSSID.conf
sudo wpa_supplicant -B -i wlan0 -D wext -c MYSSID.conf
sudo dhcpcd --nohook wpa_supplicant wlan0
#unsecured? change the conf file to:
network={
 ssid="MYSSID"
 key_mgmt=NONE
}
Forwarding the connection
You can forward the connectivity of your HackOTG through your emulated Ethernet device by simply enabling ipv4-forwarding with this command:
sudo sh -c "echo 1 > /proc/sys/net/ipv4/ip_forward"
This can be handy if you need to register or fill in a form in a captive portal. Or if you just need a WiFi-connection.
Checking the internet connection
You will have 2 active interfaces now. By performing the “route -n” command, you can see the way your traffic is going to be handled. Sometimes you will want to choose the connection to use for you internet connectivity. You can do that with these scripts:
route_wlan0.sh: (to direct all traffic through the WiFi-connection)
sudo route del default
sudo dhcpcd -n wlan0
route_usb0.sh: (to direct all traffic the emulated ethernet connection)
sudo route del default
sudo dhcpcd -n usb0
Remember, if you dont’t have connectivity to the internet, check if the proper interface is on the first line in the output of the “route -n” command. But now that we have connectivity, we can update all our software with the following commands:
sudo apt-get update
sudo apt-get upgrade
sudo apt-get dist-upgrade
Great, we can connect to wifi-hotspots now, which we can not only use for an internet connection but if you know the IP (use ‘ifconfig’) you can connect to it over wifi.
Next, we will setup our own WiFi-hotspot, so we don’t have to configure a WiFi-hotspot over the emulated Ethernet-device if we want to SSH to the device over WiFi.
You can find the next one here:
-
HackOTG (v1.1): Integrating the cable for more portability
This article is part of a series: you can find the first article here.
Before we start using our device, we have to make sure it is a good form-factor for our purpose and at this point, we will always need a USB-cable attached to the device, to be able to interface with it. In the future we will sometimes want to connect with WiFi so we can use the same connection to emulate different devices for our physical attacks.
No matter what, we will need the cable attached to it, be it for power, connectivity or attack. There are handy connections on the bottom of the Pi zero to make the following process easier. If you don’t want to perform this mod, you don’t need to, but it is very handy and makes the whole platform more compact and portable.
What do you need?
- Soldering iron, solder and tweezers (small wires)
- Pi zero
- Spare USB-cable
- Small zip tie
- Knife
- Pliers
- Glue
Putting it all together
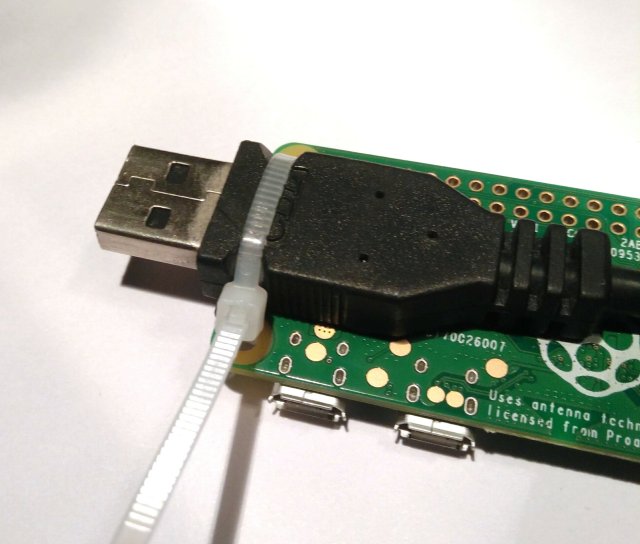
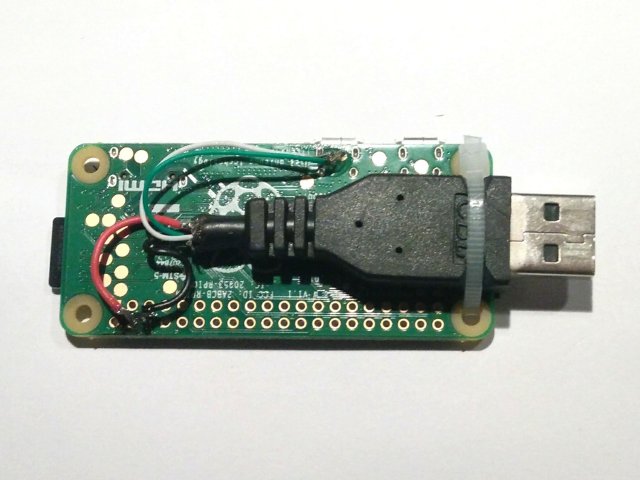
No surprises here, snip of the USB-A side, strip the cable from the black plastic layer, and you’ll find a metallic shielding layer with 4 cables in it (white, green, red, black). Those are 2 data-cables and 2 for power. If you make 2 small indentations on both sides of the USB-port, you can tie a cable-tie around it and through the holes. Pull the cable-tie very tight (use pliers) and it wont move anymore.
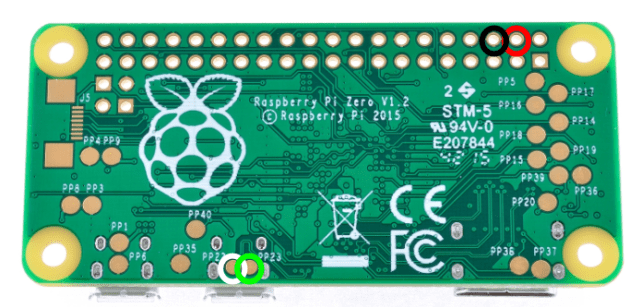
Solder the cables to the pads with respective indicated color on the image below. The cables can be as short as 5cm. You can drop a bit of glue onto the wires to insulate them form each other again.
The result and what’s next?
Now you don’t have to carry a USB-cable together with the Pi, it is already integrated in the device! If you plug it straight into a power source (battery, wall-socket, …) it will boot. And if the device is also a USB-host, it will present itself as an Ethernet-to-USB adapter and we can SSH into it to perform our work. Now we can start using our HackOTG everywhere!
You can find the next one here:
-
HackOTG (v1.0): A universal, portable, security-platform
When demonstrating a possible attack vector to a friend or a client, you want something standalone that is not influenced by your day-to-day tasks. Many have a persistent Kali Linux on a bootable USB-drive exactly for this purpose. There are also many attack-vectors which require physical devices. Exploits like DNS-tunneling, HID-attacks and BadUSB are only a couple of examples.
You can buy specific devices like the USB rubber ducky to perform these attacks in an easy, portable, quick way. Apart from being quite costly, you can’t carry them all in your everyday backpack and they often require to be reprogrammed for a different attack on the same vector… So having multiple will only make it worse.
I’ve ported a lot of my physical exploits and some wifi-exploits to my Android device. It’s disguised, an all-in-one and you’ll always have it on you. An OTG-cable in my backpack and I’m ready to go… But often a lot of these exploits require a custom kernel or some modules to be able to function. Many tweaks are also device specific. When there is an update, a lot of unexpected things can happen. Not the best solution.
So I was searching something open-source, portable, inexpensive, expendable, easy-to-mod and easy to interface with and change it behavior and I found this:
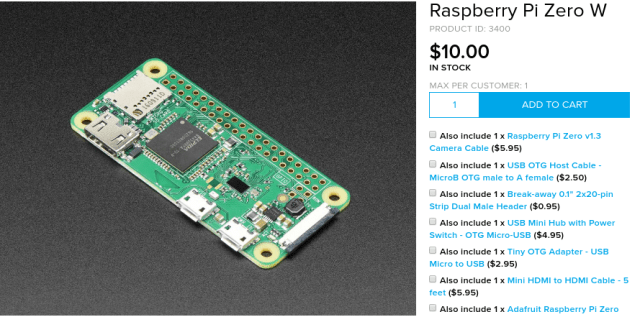
It is essentially a small stand-alone computer, running Linux of an SD-card. What is cool about this model is, that it has WiFi and Bluetooth and a board-setup configured to support USB-gadget or OTG mode. Which can change one of the micro-USB ports in whatever USB-device that you want (HID, Ethernet Dongle, Mass-storage, MIDI, … ). It is powered with a normal 5v micro-USB cable plugged in a USB-device or wall-adapter.
We can set it up as a headless device that we can ssh into over a WiFi-signal or even easier, making it emulate an ethernet device. The rest of this article will describe how to get it to emulate an Ethernet to USB controller and SSH’ing into it without ever attaching a display.
Preparing the SD-card
The software that is best adapted to the hardware is Raspbian. You can try to do the same steps on other ARM OS-distro’s, but from my experience they lack a lot of support for OTG. The idea is to make a very-easy-to-recreate setup so if it is not your favourite flavour of linux, no worries.
There are many ways to install Raspbian, but you basically download the diskimage and write it to the SD-card. if your SD-card is bigger than the original disk-image, expand the partition to its full size. In this article you’ll find a guide how to do this on Linux.
A SD-card in a raspberry pi consists of 1 small FAT-partition with boot files and 1 large EXT4-partition. Recreating the partition table and copying the right files on each will also give you a working system (but Raspbian gives you a ready disk-image).
Download the Raspbian Lite-image: (You don’t need te full one)
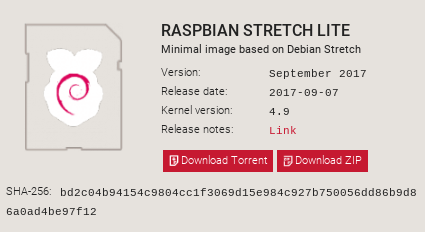
wget https://downloads.raspberrypi.org/raspbian_lite_latest
unzip raspbian_lite_latest #will unzip an .img file
Flash your SD-card:
Plug your SD-card in your pc with an card-reader. Your SD-card size and type matter, but are not that important. You want a fast one (indicated by its class, 10 is best) and anything above 2 gb will work well if using the lite-image. If you deploy this somewhere and it has to record or log something, make sure that it has disk-space to do so. At the time of writing a quality SD-card of 32 gb is 20 EUR, so that would bring the total cost to ~30 EUR excluding cables (which you probably have too much of).
Double-check before running these commands!
fdisk -l #lookup the device name of your SD-card (ex. /dev/mmcblk1)
Disk /dev/mmcblk1: 29.8 GiB, 32026656768 bytes, 62552064 sectors
Units: sectors of 1 * 512 = 512 bytes
Sector size (logical/physical): 512 bytes / 512 bytes
I/O size (minimum/optimal): 512 bytes / 512 bytes
Disklabel type: dos
Disk identifier: 0x00000000

Device    Boot Start End      Sectors  Size  Id Type
/dev/mmcblk1p1 8192  62552063 62543872 29.8G c  W95 FAT32 (LBA)
dd bs=4M if=2017-09-07-raspbian-stretch-lite.img of=/dev/mmcblk1 conv=fsync #change /dev/mmcblk1
442+1 records in
442+1 records out
1854590976 bytes (1.9 GB, 1.7 GiB) copied, 99.8628 s, 18.6 MB/s
Resize partition to full disk: (Optional)
fdisk /dev/mmcblk1 #change /dev/mmcblk1 to your device
Welcome to fdisk (util-linux 2.30.2).
Changes will remain in memory only, until you decide to write them.
Be careful before using the write command.
Command (m for help): p
Disk /dev/mmcblk1: 29.8 GiB, 32026656768 bytes, 62552064 sectors
Units: sectors of 1 * 512 = 512 bytes
Sector size (logical/physical): 512 bytes / 512 bytes
I/O size (minimum/optimal): 512 bytes / 512 bytes
Disklabel type: dos
Disk identifier: 0x11eccc69
Device Boot Start End Sectors Size Id Type
/dev/mmcblk1p1 8192 93813 85622 41.8M c W95 FAT32 (LBA)
/dev/mmcblk1p2 94208 62552063 62457856 29.8G 83 Linux
Command (m for help): d
Partition number (1,2, default 2): 2
Partition 2 has been deleted.
Command (m for help): n
Partition type
 p primary (1 primary, 0 extended, 3 free)
 e extended (container for logical partitions)
Select (default p): p
Partition number (2-4, default 2): 2
First sector (2048-62552063, default 2048): 94208
Last sector, +sectors or +size{K,M,G,T,P} (94208-62552063, default 62552063):
Created a new partition 2 of type 'Linux' and of size 29.8 GiB.
Partition #2 contains a ext4 signature.
Do you want to remove the signature? [Y]es/[N]o: n
Command (m for help): w
The partition table has been altered.
Calling ioctl() to re-read partition table.
Syncing disks.
At this point you will have a working operating system.
Configuring the device
Now that you having a working image, it is time to change some files with settings to make you able to connect to it. This will be achieved by configuring the OTG-port (micro-usb port marked with “USB”) to emulate an Ethernet-to-USB dongle. With a working connection, we will be able to log in through SSH.
Mount both partitions:
mkdir boot
mount /dev/mmcblk1p1 boot
mkdir root
mount /dev/mmcblk1p2 root
Setup USB-gadget, Ethernet-to-USB:
Add a line to boot/config.txt, using this command;
echo 'dtoverlay=dwc2' >> boot/config.txt
After the command ‘rootwait’ in boot/cmdline.txt add the following command (keep it as one line);
# boot/cmdline.txt
... rootwait modules-load=dwc2,g_ether ...
This will load the kernel-module needed and emulate a Ethernet-to-USB device on the USB port. You can also change this after the device is booted, but we have no other way of accessing the device, so we want this behavior on boot.
Configure a static IP:
Open the file root/etc/network/interfaces and add the following snippet to the end of the file:
# root/etc/network/interfaces
allow-hotplug usb0
iface usb0 inet static
address 192.168.7.2
netmask 255.255.255.0
network 192.168.7.0
broadcast 192.168.7.255
gateway 192.168.7.1
If the device is connected with its emulated ethernet-device, we will know its IP without using a DHCP-server or discovery-service.
Enable SSH-server (headless way):
SSH-server was enabled on the early versions but there was a security issue for many people who were not aware of this. To make it easy to enable this feature you can put an empty file named ‘ssh’ on the boot partition and it will enable it for you (the file will be gone after).
touch boot/ssh
Unmount the SD-card:
sync
unmount boot root
Using the device
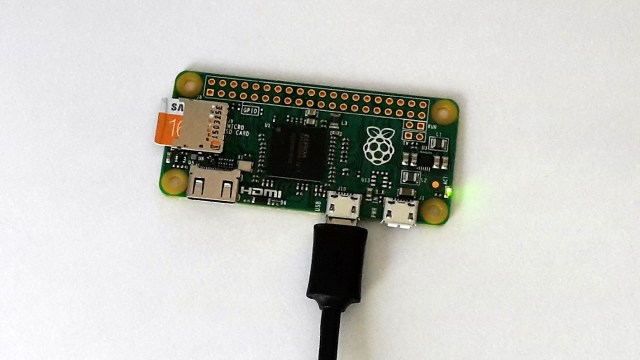
If everything is set up correctly, you can use a micro-USB to USB-A (regular charging cable) to connect your device with the “USB” marked port to your computer (or any other device with a terminal). The connection will give both a 5V power and a data-connection to your Pi. After plugging the device in, the ACT light will start blinking if the SD-card has a bootable operating system on it. The first time the boot up process will take longer, but normally this takes about 10 seconds.
On Linux, you can check your interfaces by issuing the command:
ifconfig
If everything is working properly, you’ll see this new interface;
...
usb0: flags=4163<up,broadcast,running,multicast> mtu 1500
     inet6 fe80::a8ac:4ff:fe31:3a2e prefixlen 64 scopeid 0x20
     ether aa:ac:04:31:3a:2e txqueuelen 1000 (Ethernet)
     RX packets 28 bytes 3312 (3.2 KiB)
     RX errors 0 dropped 0 overruns 0 frame 0
     TX packets 5 bytes 734 (734.0 B)
     TX errors 0 dropped 0 overruns 0 carrier 0 collisions 0
...</up,broadcast,running,multicast>
To be able to SSH to the device we will need an IP ourselves. There is no DHCP-server on this 2-man network so we will give us one ourselves (in the same netmask). Use this command: (You’ll have to do this every time you plug in the device)
ifconfig usb0 192.168.7.3
Now you can SSH to this device with the default credentials (user: pi, pass: raspberry):
ssh [email protected]
What next?
Now that we have the basics figured out, in the next version we will hack the hardware to make the device include a USB-port so it is truly portable.
In the rest of the series we will start building our universal hacking/debugging tool so we can connect to it over WiFi and use its emulation capabilities to demonstrate physical attack-vectors.
You can find the next one here:
-
Hack: Get free WiFi on paid-access hotspots with a DNS tunnel
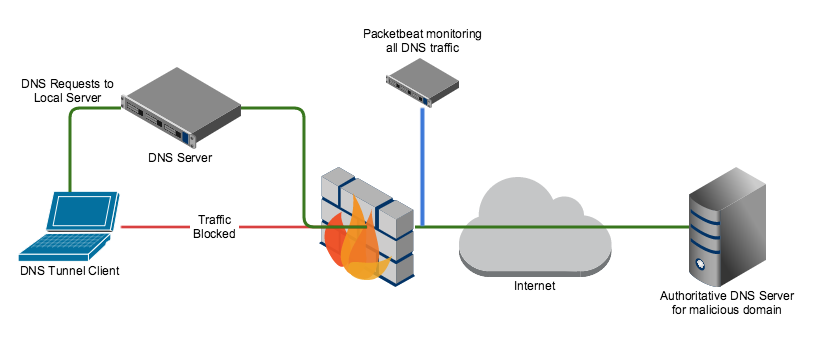
Everybody knows that you can’t connect to a WiFi-hotspot if it is secured and you don’t have a the password. But at airports, train-stations or homes with a routers from a big provider you will have a unsecured wifi hotspot, but when you connect to it and you open your browser, you will get prompted to log in or supply a credit card, etc… . Great if you have a login but otherwise you are stuck behind this ‘captive’ portal (that is what this page is called).
How to bypass a captive portal
Often you can bypass a captive portal page by using DNS tunneling. You can test if this attack is possible by trying to ping google.com. Try this command;
ping www.google.com
[root@localhost ~]# ping www.google.com
PING www.google.com (172.217.17.36) 56(84) bytes of data.
You don’t need to get a PING back, but you can see that www.google.com resolved to 172.217.17.36, this means that DNS is still working… strange if you don’t have an internet connection right?
So this means that DNS is still working. If we give the router a domain, it will resolve it by sending it to a nameserver and it will keep searching till if finds the IP, which it will send back to us. Now if you specify a subdomain (“mail” in mail.google.com) it will ask the nameserver of the subdomain (if it exists) to give the right IP and relay it back.
This means that if we control the subdomain we are looking up, and we control the nameserver assosiated with it, we can decide which IP (or better DNS record) to send back. The result is that we can upload data through an extra attached subdomain and download data encoded in the DNS-record that is send back. This process is called DNS-tunneling. To encode this data, there are multiple tools available but iodine is a great one, and this is that is used in this article.
What you need to setup:
- Spare (Linux) machine at home, this can be an existing server or desktop.
- Dynamic DNS that resolves to public IP of server (explained in this article)
- A subdomain that holds a NAMESERVER-record (explained in this article)
- Iodine-daemon on the server (explained in this article)
- Router which you can setup with static IP’s and Port forwarding
Setting up the DDNS and NS-record
You can use freedns.afraid.org for the dynamic DNS and the NS-record. So make an account and go to “subdomains”. You need to make 2 subdomains. One is a normal A-record (domain name to IP) and one of the type NS that is redirected to the A-record so it points to the public IP of the server at home.
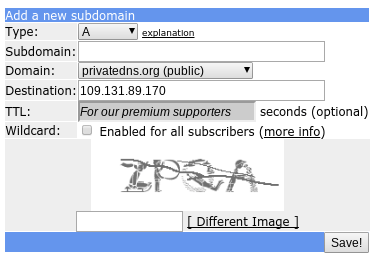
For the A-record fill in a sub domain (can be anything, just remember it) and choose a domain (these are donated by a large community to use). fill in the captcha and done.
The NS-record do the same, but change the destination to the A-record you just made (
. ). The IP of the A-record was auto-filled when the subdomain was created but it needs to be periodicly updated by the server, so it keeps pointing at the public IP of you home-router with the server behind it. There are many ways to do this (can be found here), but one of the easiest is fetching an url with a curl-command every 60 seconds.If you go to freedns.afraid.org/dynamic, you can choose your subdomain of your A-record and get the link behind ‘direct link’.

It looks like this:
https://freedns.afraid.org/dynamic/update.php?<your-key>
ddns.sh:
while true
do
    curl https://freedns.afraid.org/dynamic/update.php?<your-key>
    sleep 60
done
Put this on the server at home. This is a script that calls the url every 60 seconds so it keeps updated over time. You probably want to execute it on boot. On a system with systemd you can use this service file:
/usr/lib/systemd/system/ddns.service:
[Unit]
After=network.target
Requires=network.target

[Service]
ExecStart=/usr/bin/sh /root/ddns.sh

[Install]
WantedBy=multi-user.target
Then run these commands to check if it works and if so, make it persistent.
sudo systemctl start ddns.service
sudo systemctl status ddns.service #check if ok sudo systemctl enable ddns.service #make it persistant over boot
Now if you ping your A-record subdomain you will get the IP of your router at home. The ddns.service will keep it that way.
Configuring the Iodine-daemon
First you have to install the iodine program on the server at home, find it in the repository as “iodine” or “iodine-server”. For Arch-Linux this is the following command:
pacman -Sy iodine
Now you want to configure the daemon with the info of your record and make it start at boot. This is the command that has to run on boot:
/usr/bin/iodined -f -c -l $IODINE_BIND_ADDRESS -n $IODINE_EXT_IP -p $IODINE_PORT -P $IODINE_PASSWORD -u $IODINE_USER $TUN_IP $TOP_DOMAIN
On Arch-Linux the service file is already supplied and the settings can be found at /etc/conf.d/iodined: (you only need TOP_DOMAIN and IODINE_PASSWORD)
# Address and subnet to use for the tunnel (default mask is /27)
 TUN_IP="172.18.42.1/24"

# Password (32 characters max)
 IODINE_PASSWORD="mypassword"

# The domain you control, see documentation.
 TOP_DOMAIN="<subdomain>.<domain>.com"

# UDP port iodined should listen on.
 IODINE_PORT="53"

# Local IP address iodined should bind to.
 IODINE_BIND_ADDRESS="0.0.0.0"

# External IP of your iodined server, used in DNS answers.
 IODINE_EXT_IP=""

# The user iodined should run as.
 IODINE_USER="nobody"
When ready run these commands to make it run at boot on an Arch-Linux system:
sudo systemctl start iodined.service
sudo systemctl status iodined.service
sudo systemctl enable iodined.service
Note: You really want to set a password, this is not for encryption, this is not encrypted in any way, but for authentication, so not everybody can use your DNS-tunnel.
Now you need to port-forward port 53 (the port DNS uses) on your home-router to your device, used as server. This is different for every router but generally you also want to make the internal IP “static” for this device so it does not change after a reboot. Now your Iodine-daemon is accessible from outside of your network.
You can check if everything is properly setup by filling it in on this page http://code.kryo.se/iodine/check-it/. It will tell you were it failed if something is not in order. If it works, let’s bypass some captive portals!
Usage
You should install the iodine-client before you get stuck somewhere without internet.
It is found in many repositories as “iodine” or “iodine-client”. On Arch-Linux:
pacman -Sy iodine
Then to use this technique when you are behind a captive portal, make sure you are connected to the hotspot. Then, when you have confirmed there is a hole in the security of the captive portal with the ping method described in the first part of this article, run the following command. (it will ask a password if set)
iodine <subdomain>.<domain>
Enter password:
Opened dns0
Opened IPv4 UDP socket
Sending DNS queries for ****.****.*** to 192.168.1.1
Autodetecting DNS query type (use -T to override).
Using DNS type NULL queries
Version ok, both using protocol v 0x00000502. You are user #0
Setting IP of dns0 to 172.18.42.2
Setting MTU of dns0 to 1130
Server tunnel IP is 172.18.42.1
Testing raw UDP data to the server (skip with -r)
Server is at 192.168.1.2, trying raw login: OK
Sending raw traffic directly to 192.168.1.2
Connection setup complete, transmitting data.
Detaching from terminal...
Awesome! We have a tunnel. Now we can contact every port on the server at 172.18.42.1, for example we can SSH to the server:
ssh [email protected]
Now to tunnel a internet connection through, you can use the built in SOCKS-proxy of SSH. To use it supply the -D option with a local port to put the proxy on. All your internet will be tunneled over the ssh-connection if you specify the proxy in your program. example of the command:
ssh [email protected] -D 5000
Research how to setup your programs on your system to use the proxy or use this quick tip which explains how to run commands through a proxy. There is also a transparent way that tunnels all internet through a ssh tunnel explained here.
Hope you learned something about how the internet works and have some free internet in the meanwhile. Have fun!
-
Receive all your web updates in your mailbox with rss2email

So I have a couple sites I check regularly… YouTube, a couple blogs, Reddit-pages, LinkedIn and some news-sites. Often it happens that I miss some interesting article, or in general, I have to remember to check it. It’s not very productive to have the feeling you have to check everything, all the time.
A good way to go about this is subscribing to newsletters and reviewing settings of your online accounts to have messages send to your mail inbox. Great, but not every simple site has this option and newsletters often are to bloated with ads and calls to action to be fun to read.
I’ve wanted to solve this problem for quite a while but never found a good solution. My general philosophy is having everything on every device working in exactly the same way. I make sure I get a terminal on every device and from there I open my Linux environment with all my tools setup and synced.
And then I discovered RSS
Most sites today offer a RSS-feed. This is a file that resides somewhere on the domain (often linked somewhere on the homepage) and is a very simple XML file that has a summary of the meaningful changes to a site. Most engines like WordPress and Joomla have it by default. And any major site will support it (I havent found one that does not). Sometimes a Google-search is needed to find the right URL for sites like Reddit, but it’s (nearly) always there.
The problem
So if you have all your links of RSS-feeds, you can put them in a program that handles all the news for you. In the early days there was Google Reader but that is gone right now (it did not fit the Google marketing anymore). There are apps like Feedly to replace it and many others.
These are definitely great, but I don’t like standalone programs. I’d like my news to end up in my mailbox. I tried online RSS to Email converters like Blogtrottr but never really liked it. It failed often and I had to go online and log in to add extra feeds. I also like to use as few resources or services as possible.
Then local converters such as newspipe and rss2email got my attention but they are the main page was down and rss2email needed a specific format to read the links from and would write my mails into an incompatible and older version of mailbox.
The DIY fix
So I realized rss2email was written in Python (Yes!) and most of its heavy-lifting was done by a module called “feedparser”. So I wrote my own script to take a list of URL’s (of rss-feeds) and add them my local inbox in Maildir-format (I use the terminal application mutt for my email). Many email-programs use this standardized format so research if yours is compatible. If you want to read a great article on how to set up Mutt I recommend this Arch Linux post and The Homely Mutt.
...
  41 N   Jan 03 RecentQuestions (2.4K) [SE TOR] Clearing the client side DNS cache provides privacy improvement?
  42 N   Jan 03 RecentQuestions (0.8K) [SE TOR] How to make VPN like Tor faster ? or is there any VPN like Tor but faster?
  43 N   Jan 03 RecentQuestions (3.2K) [SE TOR] Clearing the state of rendezvous client provides privacy improvement?
  44 N   Jan 03 LinusTechTips   (1.6K) [LTT] 5 Gadgets to help you Wake-Up
  45 N   Jan 03 BryanLunduke    (0.7K) [YT BRYAN LUNDUKE] Weekly Tech News - Jan 3rd, 2018
  46 N   Jan 03 reddit.be       (0.7K) [REDDIT BELGIUM] Wat de Nederlandse oud-premier Dries van Agt (1977-1982) vanavond op
  47 N   Jan 03 Crypt0          (2.8K) [CRYPTO] Ripple: The New World Order Coin? / BTC's Birthday! / Intel's BIG Mistake /
  48 N   Jan 03 VICENews        (1.9K) [VICE NEWS] The Darkest Place In America & Marines In Afghanistan: VICE News Tonight
  49 N   Jan 04 VICENews        (2.2K) [VICE NEWS] Scientists Can Now Quickly Link Extreme Weather Events To Climate Change
  50 N   Jan 04 VICENews        (1.7K) [VICE NEWS] The Making Of Bhad Bhabie (HBO)
...
So this is the command you can add to a macro or alias to fetch the feeds form the rss.txt file in the ~/RSS/ directory and parse them offline into emails which will be added to the ~/MAILDIR/account/INBOX
python ~/rss2maildir.py ~/RSS ~/MAILDIR/account/INBOX
...
0 found!
checking: http://www.reddit.com/r/belgium/.rss
0 found!
checking: https://tor.stackexchange.com/feeds
0 found!
checking: https://security.stackexchange.com/feeds
...
You can find the script and an example rss.txt in this Github-repo. Feel free to give tips and share your experiences!