Hack: Get free WiFi on paid-access hotspots with a DNS tunnel
Everybody knows that you can’t connect to a WiFi-hotspot if it is secured and you don’t have a the password. But at airports, train-stations or homes with a routers from a big provider you will have a unsecured wifi hotspot, but when you connect to it and you open your browser, you will get prompted to log in or supply a credit card, etc… . Great if you have a login but otherwise you are stuck behind this ‘captive’ portal (that is what this page is called).
How to bypass a captive portal
Often you can bypass a captive portal page by using DNS tunneling. You can test if this attack is possible by trying to ping google.com. Try this command;
ping www.google.com
[root@localhost ~]# ping www.google.com
PING www.google.com (172.217.17.36) 56(84) bytes of data.
You don’t need to get a PING back, but you can see that www.google.com resolved to 172.217.17.36, this means that DNS is still working… strange if you don’t have an internet connection right?
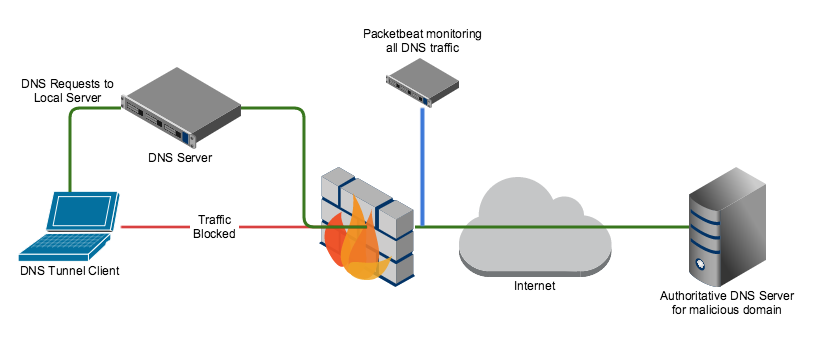
So this means that DNS is still working. If we give the router a domain, it will resolve it by sending it to a nameserver and it will keep searching till if finds the IP, which it will send back to us. Now if you specify a subdomain (“mail” in mail.google.com) it will ask the nameserver of the subdomain (if it exists) to give the right IP and relay it back.
This means that if we control the subdomain we are looking up, and we control the nameserver assosiated with it, we can decide which IP (or better DNS record) to send back. The result is that we can upload data through an extra attached subdomain and download data encoded in the DNS-record that is send back. This process is called DNS-tunneling. To encode this data, there are multiple tools available but iodine is a great one, and this is that is used in this article.
What you need to setup:
- Spare (Linux) machine at home, this can be an existing server or desktop.
- Dynamic DNS that resolves to public IP of server (explained in this article)
- A subdomain that holds a NAMESERVER-record (explained in this article)
- Iodine-daemon on the server (explained in this article)
- Router which you can setup with static IP’s and Port forwarding
Setting up the DDNS and NS-record
You can use freedns.afraid.org for the dynamic DNS and the NS-record. So make an account and go to “subdomains”. You need to make 2 subdomains. One is a normal A-record (domain name to IP) and one of the type NS that is redirected to the A-record so it points to the public IP of the server at home.
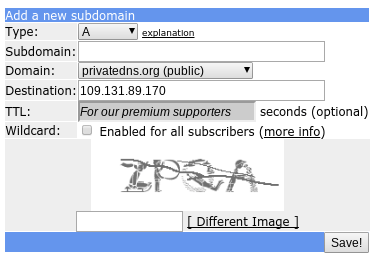
For the A-record fill in a sub domain (can be anything, just remember it) and choose a domain (these are donated by a large community to use). fill in the captcha and done.
The NS-record do the same, but change the destination to the A-record you just made (
The IP of the A-record was auto-filled when the subdomain was created but it needs to be periodicly updated by the server, so it keeps pointing at the public IP of you home-router with the server behind it. There are many ways to do this (can be found here), but one of the easiest is fetching an url with a curl-command every 60 seconds.If you go to freedns.afraid.org/dynamic, you can choose your subdomain of your A-record and get the link behind ‘direct link’.

It looks like this:
https://freedns.afraid.org/dynamic/update.php?<your-key>
ddns.sh:
while true
do
    curl https://freedns.afraid.org/dynamic/update.php?<your-key>
    sleep 60
done
Put this on the server at home. This is a script that calls the url every 60 seconds so it keeps updated over time. You probably want to execute it on boot. On a system with systemd you can use this service file:
/usr/lib/systemd/system/ddns.service:
[Unit]
After=network.target
Requires=network.target

[Service]
ExecStart=/usr/bin/sh /root/ddns.sh

[Install]
WantedBy=multi-user.target
Then run these commands to check if it works and if so, make it persistent.
sudo systemctl start ddns.service
sudo systemctl status ddns.service #check if ok sudo systemctl enable ddns.service #make it persistant over boot
Now if you ping your A-record subdomain you will get the IP of your router at home. The ddns.service will keep it that way.
Configuring the Iodine-daemon
First you have to install the iodine program on the server at home, find it in the repository as “iodine” or “iodine-server”. For Arch-Linux this is the following command:
pacman -Sy iodine
Now you want to configure the daemon with the info of your record and make it start at boot. This is the command that has to run on boot:
/usr/bin/iodined -f -c -l $IODINE_BIND_ADDRESS -n $IODINE_EXT_IP -p $IODINE_PORT -P $IODINE_PASSWORD -u $IODINE_USER $TUN_IP $TOP_DOMAIN
On Arch-Linux the service file is already supplied and the settings can be found at /etc/conf.d/iodined: (you only need TOP_DOMAIN and IODINE_PASSWORD)
# Address and subnet to use for the tunnel (default mask is /27)
 TUN_IP="172.18.42.1/24"

# Password (32 characters max)
 IODINE_PASSWORD="mypassword"

# The domain you control, see documentation.
 TOP_DOMAIN="<subdomain>.<domain>.com"

# UDP port iodined should listen on.
 IODINE_PORT="53"

# Local IP address iodined should bind to.
 IODINE_BIND_ADDRESS="0.0.0.0"

# External IP of your iodined server, used in DNS answers.
 IODINE_EXT_IP=""

# The user iodined should run as.
 IODINE_USER="nobody"
When ready run these commands to make it run at boot on an Arch-Linux system:
sudo systemctl start iodined.service
sudo systemctl status iodined.service
sudo systemctl enable iodined.service
Note: You really want to set a password, this is not for encryption, this is not encrypted in any way, but for authentication, so not everybody can use your DNS-tunnel.
Now you need to port-forward port 53 (the port DNS uses) on your home-router to your device, used as server. This is different for every router but generally you also want to make the internal IP “static” for this device so it does not change after a reboot. Now your Iodine-daemon is accessible from outside of your network.
You can check if everything is properly setup by filling it in on this page http://code.kryo.se/iodine/check-it/. It will tell you were it failed if something is not in order. If it works, let’s bypass some captive portals!
Usage
You should install the iodine-client before you get stuck somewhere without internet.
It is found in many repositories as “iodine” or “iodine-client”. On Arch-Linux:
pacman -Sy iodine
Then to use this technique when you are behind a captive portal, make sure you are connected to the hotspot. Then, when you have confirmed there is a hole in the security of the captive portal with the ping method described in the first part of this article, run the following command. (it will ask a password if set)
iodine <subdomain>.<domain>
Enter password:
Opened dns0
Opened IPv4 UDP socket
Sending DNS queries for ****.****.*** to 192.168.1.1
Autodetecting DNS query type (use -T to override).
Using DNS type NULL queries
Version ok, both using protocol v 0x00000502. You are user #0
Setting IP of dns0 to 172.18.42.2
Setting MTU of dns0 to 1130
Server tunnel IP is 172.18.42.1
Testing raw UDP data to the server (skip with -r)
Server is at 192.168.1.2, trying raw login: OK
Sending raw traffic directly to 192.168.1.2
Connection setup complete, transmitting data.
Detaching from terminal...
Awesome! We have a tunnel. Now we can contact every port on the server at 172.18.42.1, for example we can SSH to the server:
ssh [email protected]
Now to tunnel a internet connection through, you can use the built in SOCKS-proxy of SSH. To use it supply the -D option with a local port to put the proxy on. All your internet will be tunneled over the ssh-connection if you specify the proxy in your program. example of the command:
ssh [email protected] -D 5000
Research how to setup your programs on your system to use the proxy or use this quick tip which explains how to run commands through a proxy. There is also a transparent way that tunnels all internet through a ssh tunnel explained here.
Hope you learned something about how the internet works and have some free internet in the meanwhile. Have fun!